Tuesday, March 4, 2025

Hearts and Countdown to Spring


My first try at the "Strong Ukraine" heart pattern designed by FairyLaceAndMore. It's a very clever pattern! I enjoyed the challenge, and was happily surprised to discover a matching blue crystal in my stash.☺ 

New batch of "Thistle" hand dyed thread.

This picture got a lot of views on social media a couple weeks ago. The thread is hand dyed "Tourmaline", the pattern is my own "Heart Aglow", and the steam engine is from a board game box.

Crocuses are beginning to emerge from the cold ground here in my corner of Wisconsin. A welcome sign of spring!

This Lego set is for building a model of a Saturn V rocket. It actually belongs to one of my kids (who's not a kid anymore) so it's been sitting around several years. I got it out as sort of a calming pastime to keep my mind off of worrying about things I really can't do much to change. 

Friday, February 14, 2025

My artwork is in Artistonish magazine!


I'm so excited to share!

My artwork 'Leaves of Lace Garland' is now published at Artistonish - January 2025 magazine via @Biafarin portal.

To learn more, please go to:

Read the magazine via the below link:


Monday, February 10, 2025

Reviewing the book Frivolité by Sparrow Kelley


The full title is "Frivolité the complete beginner's guide to shuttle tatted lace" by Sparrow Kelley. The book is available from https://www.learnshuttletatting.com/ in both eBook and printed books. 

Here's some of my reactions to this new book:

The step by step teaching method is brilliant! How to shuttle tat the double stitch for beginners is presented in separate lessons: 
    First, the beginner is shown how to make the first half and second half of the double stitch of tatting without flipping. 
    After that is practiced, then flipping the double stitch is taught in the next lesson. 
It's really so much easier to learn one skill at a time instead of several complex skills (the knot and the flip) all at once. (I wish it had occurred to me to teach that way years ago!)

Sparrow expertly demonstrates the classic "slip and slide" method of tatting.

Troubleshooting the flip along with showing common errors is covered. All the basic techniques used in tatting patterns are shown: chains, picots, joins, lock joins, hiding ends, and blocking.

How to read patterns, both written and visual is explained clearly. Sparrow, like most modern designers, has a unique style of drawing diagrams. Those little extras, such as marking the joins and using different colors for shuttle 1 and ball thread/shuttle 2 are helpful references for understanding the pattern.

Here's my tatted piece that I made from following "Advanced Pattern #1: Interesting Edging" on page 33 in the book.

Another thing I like about the printed book is the spiral binding allows it to lay flat to any page, making it easy to keep the page open to the pattern while tatting.

Overall, I'm giving this book an A+ rating as a how-to guide for beginners. 
This is really not a book of patterns that would interest experienced tatters, unless they are looking for ideas on how to teach beginners.


Saturday, February 1, 2025

Oddities of the Cocoon pattern


The "Cocoon" pattern is found in the book "Marilee's Beaded Tatting Finery"

Some odd techniques used in it:

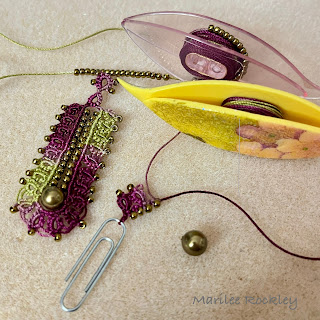
It begins with a chain on a paper clip. 
Most of the chains are in "node stitch", as 2 first halves, 2 second halves (of a double stitch). This forms a little ruffle, which allows for the seed beads to face down, below the chain.


It has a large bead held temporarily in place with a paper clip. Normal chains (not node stitch) are used to curve around the bead, and the rings thrown off the chains (also known as "floating rings") need larger picots to fit around the curve. A picot gauge is helpful here (size is given in the pattern).


There is one split ring before the top ring. 
After the split ring, the top ring can be worked as a single shuttle split ring, although the pattern doesn't say this. Also, something else I did this time (not mentioned in the pattern) is to tie a square knot before the top ring, to secure the threads better.


My opinion on finishing: 
This earring benefits from painting some fabric stiffener on the back side (which is actually the side facing you when tatting this pattern). I like the side better that has the smooth lines showing along the seed beads in the middle.

A tatted earring with fabric stiffener being applied to the back side with a brush. Sometimes I just dab the stiffener on using a pin. Although the stiffener dries clear, it does dull the sheen of the thread, so that's why I prefer to put it on the back side only.


Monday, January 27, 2025

What is a ShuttleShip?


ShuttleShip model S18 from Stephanie Cervi in turquoise color.

What you're seeing in these photos is just one version of the ShuttleShip, designed and made by StephanieCerviDesign. Click the link to see more at her website!

I've loaded mine with some of my shuttles, a ball of Lizbeth thread, crochet hook, tiny scissors, and a tatting project in progress to show how much the S18 model can hold. 

Both large and small Clover brand shuttles will fit, as well as Lacis Sew Mate shuttles. Handy Hands Starlit shuttles are too large for this model, but there are other ShuttleShips available that can accommodate them. 

It's said to be very helpful for Helix tatting, but I have not yet tried that technique so can't comment about that. What I currently am using it for is to organize my medium-large shuttles so I can find them to prepare demonstration "step outs" for a class that I will be teaching in April at the Finger Lakes Tatting Gathering. 


Thursday, January 16, 2025

I'll be teaching at Finger Lakes 2025


The "Burst of Joy" necklace that I'll be teaching

Yes! I'll be there, live and in person, along with many other excited tatting people at the Finger Lakes 25th Anniversary Gathering, April 4-6, 2025.

Picture from Finger Lakes 2018. I'm standing on the right.

Hope to see you there!